Here I have a Rose Nail art for u guys that you will totally love.Whenever i am out of ideas, i turn to roses. They are just so easy and
pretty looking that i cannot seem to stay away from them for too long.
Check out the photos below to see how i did them :)

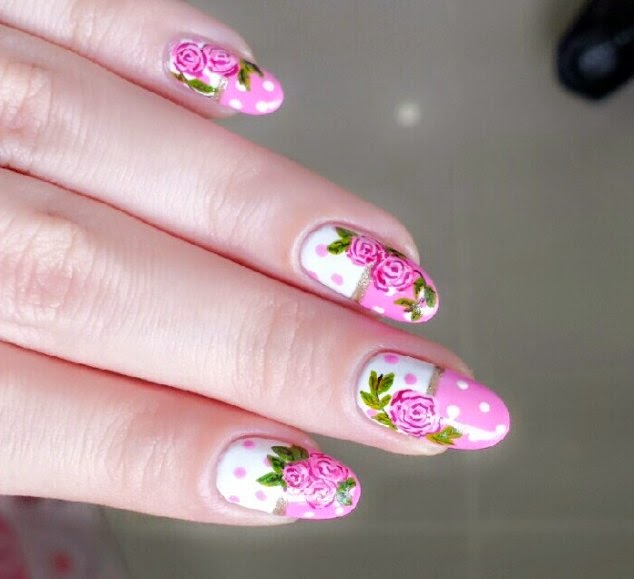
As you can see below, this is the base of my nail art before i start on the roses. I painted 2 layers of a white polish before i paint on 1 layer of a medium pink polish on the bottom half of my nails. Don’t worry about the line being neat because you will go over the line with some gold polish. Then add on some alternating polkadots with a dotting tool or toothpick and you will get the results below!

So the trickier part comes when you are drawing the roses. Usually i use at least 3 shades of a colour for the roses for added dimension. I start off by using the medium shade to draw blobs on the nails. I then randomly draw on squiggles using the lighter and darker shade to bring out the effect. Everyone has different methods so just experiment with what you like best! For the leaves, i utilize the same concept and use lighter and darker shades of green to accent different parts of the leaves. And voila! you are done! The results may not be ideal at first but keep experimenting and you will find a look that you like. The best part about drawing roses is that every single rose looks different so you don’t really need to get them perfect.

Hope you guys loved it! :D
As you can see below, this is the base of my nail art before i start on the roses. I painted 2 layers of a white polish before i paint on 1 layer of a medium pink polish on the bottom half of my nails. Don’t worry about the line being neat because you will go over the line with some gold polish. Then add on some alternating polkadots with a dotting tool or toothpick and you will get the results below!
So the trickier part comes when you are drawing the roses. Usually i use at least 3 shades of a colour for the roses for added dimension. I start off by using the medium shade to draw blobs on the nails. I then randomly draw on squiggles using the lighter and darker shade to bring out the effect. Everyone has different methods so just experiment with what you like best! For the leaves, i utilize the same concept and use lighter and darker shades of green to accent different parts of the leaves. And voila! you are done! The results may not be ideal at first but keep experimenting and you will find a look that you like. The best part about drawing roses is that every single rose looks different so you don’t really need to get them perfect.
Hope you guys loved it! :D
No comments:
Post a Comment