Friday 30 May 2014

How-To: Pretty Pink Pastel Lips.


Here's how you can create this pretty pastel pink lip on your own.


1. Condition and line. Condition your lips first to help hydrate any cracked, dry spots. Then line your lips with a clear lip liner — this will keep the lip color you're about to apply from bleeding. Here, Lizzie Power, owner of Awoke Vintage, a clothing story in Brooklyn, applied No More Bleeding Lips along the perimeter of her mouth.

2. Fill in your lips with a pink lip liner. Lizzie used Estée Lauder Lip Pencil in "Pink Writer."

3. Create a chalky-pink lip color. Mix a peachy-pink lip color with a nude one to make an opaque shade. Here, Lizzie combined Obsessive Compulsive Cosmetics Lip Tar in "Femme," a peachy-pink shade, with MAC Cosmetics Cream Color Base in "Nude."

4. Pump up the color. Press a hot pink blush, like NYX Cosmetics Powder Blush in "Matte Hot Pink," over your lips with a flat makeup brush to set the shade and give it a matte finish. 

5. Pat on some SPF and make your lips pop by applying concealer around your mouth. Lizzie used a zinc-based SPF, like Sun Bum Sunscreen, to give that opaque pastel finish to her lips, and then cleaned up the areas around her mouth with a concealer, like Clé de Peau Beauté Concealer, to make her lip color pop. 


And voilà! A gorgeous pale pink lip color that you can wear anywhere.

Friday 23 May 2014

Makeup How-To: Get Summer-Ready, Gorgeous Matte Skin


Summer skin is often shiny skin, which can translate to sweaty, greasy, and not cute. To tone down the sheen and leave your skin looking gorgeously matte, follow these simple steps from celebrity makeup artist Kirstin Piggott, who dolls up the faces of Kate Moss, Georgia May Jagger, and more. 


1. Prep your skin. First, cleanse, tone, and moisturize your skin, so your makeup goes on easier and lasts longer. Then, apply a matte primer over your T-zone to give you extra mattifying protection in that area, since it's the oiliest spot on your face. Charlotte swiped on MAC Cosmetics Matte.

2. Break out the matte BB cream. Apply a matte BB cream all over your face using your fingers to warm the formula and really work it into your skin. Use no more than a pea-size amount because you don't want the makeup to look heavy and caked on. Try Rimmel London Matte BB Cream, which Charlotte applied in "Light."

3. Add a bit of concealer. If you need extra coverage, apply concealer to touch up any problem areas, like dark circles or a blemish. "You always want to apply concealer after you've put on your base to avoid using too much concealer," Piggott says. Charlotte used YSL Touch Éclat concealer.

4. Set your concealer. Sweep a transculent powder, like Laura Mercier Secret Brightening Powder, underneath your eyes only, since the concealer can get greasy in that area. This not only sets the concealer, but also has light reflective properties so it brightens the eyes.

5. Dab a bit of matte blush onto the apples of your cheeks. In keeping with the matte theme, use a cream blush with a matte finish (or a powder), so your look doesn't fade by 4 p.m. And go for a natural shade of blush, such as Rimmel London Stay Blushed Liquid Cheek Tint in "Peach," so you're left with a soft flush. Do not top your your matte skin with a shiny blush, because it will make your cheeks look greasy.

6. Finish with lip balm. Apply a flesh-toned lip balm to your mouth for a beautiful, natural-looking lip and to complete your fresh-faced matte skin. Try Elizabeth Arden Eight Hour Cream Skin Protectant.

Finally, here you go! :*

Thursday 15 May 2014

The Best Sunscreens to Buy This Summer!

 Since sexy skin is sun-safe skin, you should slather on one of these SPFs this summer. 


1. 

Best for All-Over Body Quick Coverage:

This formula wicks away sweat, chlorine, and salt water, so it protects your skin for up to 80 minutes. That way, whether you're at the beach playing frisbee or sitting pool- or surf-side, your skin will be shielded.L'Oréal Paris Advanced Suncare Quick Dry Sheer Finishing Spray SPF 50, $8,walgreens.com


2.
Best for Sports Fanatics: 

After a game of beach volleyball or throwing the football back and forth with your BF, reapply with this broad spectrum, water-resistant formula. It instantly cools your skin with aloe as it protects it with SPF 50. Banana Boat Sport CoolZone Sunscreen Lotion SPF 50, $10, drugstore.com


 3.

Best for Your Eyes: 

This daily eye cream not only protects from harmful UVA/UVB rays, but also against pollution, stress, and dehydration. Clinique Superdefense Age Defense Eye Cream Broad Spectrum SPF 20, $40, clinique.com


4.
Best for daily face protection:

This moisturizer is strong enough to fight dehydration, fine lines, and other signs of aging, but its oil-free formula won't clog your pores.Olay Total Effects Anti-Aging Daily Moisturizer SPF 30 with SolaSheer Technology, $18, target.com


5.

The best dry oil spray:
This water- and sweat-resistant oil spray can be used to protect and hydrate both your skin and your hair.Clarins Sunscreen Care Oil Spray SPF 30, $35, clarinsusa.com


6.
Best for travel:
 This broad spectrum water- and sweat-proof, paraben- and oil-free, hypoallergenic formula has the Skin Cancer Foundation seal of approval, so you know it'll definitely keep you from burning while you're in the water. It contains vitamin E, an antioxidant that helps to neutralize free radicals, which are the main cause of premature skin aging. Translation: You'll look younger longer and still get to ride the waves.Bonus: It's available in a 3-ounce travel-friendly size.Sun Bum Broad Spectrum SPF 30 Shorties, $12, trustthebum.com

                                       Hope you have a SAFE SUMMER!


Tuesday 6 May 2014

11 things never to PUT ON FACE!


If you put these products on your face, you will regret it.

1. Hair Spray. You may have heard somewhere that it will help set your makeup, but it should NEVER be applied to your face because it contains lacquers and alcohol that will dry our your skin, causing your skin to become dehydrated and you to look older. Plus, hair spray has repellents in it that could irritate your skin, leaving it red and bumpy.

2. Deodorant. Just because it keeps your underarms from sweating through your shirt does not mean it should be swiped over any area of your face that might perspire in hopes of keeping your makeup from melting down your face. You want your skin to be able to breathe. It's doing what it needs to for a reason, and you don't need to stop it. If you want to learn how to keep your makeup in place when temperatures rise, read this.

3. Hair Color. If you color your hair regularly and want your brows to match, use a vegetable-based colorant or tinted brow mascara on your arches instead of your at-home hair color, since the formulas are less harsh. Box dye can be too irritating for the skin around your eye area and can even make your eyes burn and tear up. 
4. Vegetable Shortening. Even though this can be applied to your body skin to help treat psoriasis, it's far too heavy for your face and may even clog your pores, leading to breakouts. 

5. Shampoo. The same surfactants that clean your hair, stripping it of excess oil and dirt, are not the same ones that you should be cleansing your skin with. Shampoos are manufactured to clean and do things to your hair shaft, they're not designed to deal with the delicate molecules of your skin. If you washed your face with shampoo, it would end up being really dry and flaky.

6. Hair Serum. Just because a formula has the word "serum" on the label doesn't mean it's the same kind of serum that your skin can handle. You're trying to coat the hair shaft with different types of ingredients that you wouldn't normally use to treat fine lines or any other skin woes. Plus, a lot of them contain fragrances that can heavily irritate your facial skin.

7. Body Lotion. It would be nice to just slather on one lotion and be done with it, but body lotions should NEVER be applied to your face because they're usually a lot thicker and typically contain fragrances that might irritate your facial skin. On your face, you should always use something more gentle and delicate. Think of body lotions and creams like spackle — they're there to fill in lost moisture, not to target your facial needs like anti-aging.

8. Foot Creams. This is basically a no-brainer, but if you're desperate and only have a foot cream laying around, DO NOT put it anywhere near your face — even if you just have a tiny dry patch. They're just too rich, thick, and sticky to be applied to your facial skin. They're formulated to break down thick calluses on your feet and often contain chemical exfoliants at percentages that you would never want to use on your face. 

9. Nail Polish. Trying to paint your face for a Halloween or costume party? This only belongs on your nails. It has acrylic molecules that will actually dry the skin out. So, if you're thinking about doing up your face for a theme party, only use paint designed for your face.

10. Acetic Acids aka Vinegar. Yes, you can apply vinegar onto your face as a toner, but it's better to get a toner that contains the ingredient instead of whipping a bottle out of your kitchen cabinet. Vinegar can lose water over time and become stronger, so if you use it on your skin, it can actually burn it if you don't know exactly how long it's been in your possession. 

11. Mayonnaise. This ingredient is in a lot of DIY hair masks because it's hydrating TO YOUR HAIR. But it's not a good idea to put it on your skin because it's too acidic and too occlusive, meaning it doesn't allow your skin to breathe and can clog your pores. If you want to try any at-home facial masks, here are a few that are safe to whip up.

Sunday 4 May 2014

Nail Art How-To: Sexy Snakeskin Mani

Here is a beautiful snake nail art design that you will absolutely LOVE!

Sexy meets chic with this blue snakeskin mani. Nail artist Simcha Whitehill aka Miss Pop shows you exactly how to recreate it with ease.

 
1. Prep. File your nails into the desired shape, push back your cuticles — DO NOT CUT THEM! — and then apply one layer of a base coat polish, followed by two coats of Essie Borrowed & Blue.

2. Paint on some diamond shapes. Turn the bottle brush so that it's on a diagonal and make three to four short strokes in a row up the middle of your nail to create a row of diamond shapes. Then, use the same motion to create a line of triangles along the sides of your nail. Here, I used Deborah Lippmann's On The Beach

3. Create scales. To create the look of scales along the diamonds and triangles, dip a small striper brush in O.P.I. Incognito In Sausalito, and then press the brush tip down over and over again all around the edge of the diamonds and triangles. "The quicker you apply the polish, the more imperfect and real the scales will appear," 

4. Fill in the empty space with more scales. Using the same brush dipped in the navy polish, place a few extra scales inside the diamonds and in between them. Finally, seal your look with topcoat.

Boom: Chic nails that people are going to pin the hell out of.

Makeup How-To: Sexy, Smoky Eyes & Dark Lips

Create this sultry, smoky eye and bordeaux-colored lip look with the help of these tips from makeup artist Lauren Cosenza.

1. Line your eyes. Start by lining your eyes with a black eyeliner along your top and bottom lashlines and inside your waterline. Try Josie Maran Black Eyeliner.

2. Add dimension to your eyelid. Using a chocolate brown eyeshadow, like MAC Cosmetics Eyeshadow in Brun, brush the color over your lid using a contouring eyeshadow brush, then smudge the same shadow shade along your lower lashline.

3. Sweep shadow into the crease. Apply a brownish-champagne-colored eyeshadow to the brow bone using a fluffy brush and work it into the crease to diffuse any hard lines. Try CoverGirl Eye Enhancers 1-Kit Shadows in Tapestry Taupe.

4. Line and fill in your lips. To finish this allover dark look, line and fill in your lips with brown lip liner, like MAC Cosmetics Lip Pencil in Boldly Bare. Finish by applying Aquaphor over the lip liner to give it some sheen.


Saturday 3 May 2014

18 Quotes That Will Make You Love Your Body Even More

1. Khloe Kardashian

   "I'm proud of my body. I'm finally in a good place and learning to love me for me, and not somebody else's standards."

2. Jennifer Lopez

   "You have to stand up and say, 'There's nothing wrong with me or my shape or who I am; you're the one with the problem!'"

3. Drew Barrymore

   "My limbs work, so I'm not going to complain about the way my body is shaped."

4. Jennifer Lawrence

   "If anybody even tries to whisper the word 'diet,' I'm like, 'You can go f*ck yourself.'" 

5. Ariana Grande

   "I think it's so important for girls to love themselves and to treat their bodies respectfully."  

6. Meryl Streep

   "Everyone tries to look a cookie-cutter kind of way, and actually the people who look different are the ones who get picked up."  

7. Kim Kardashian

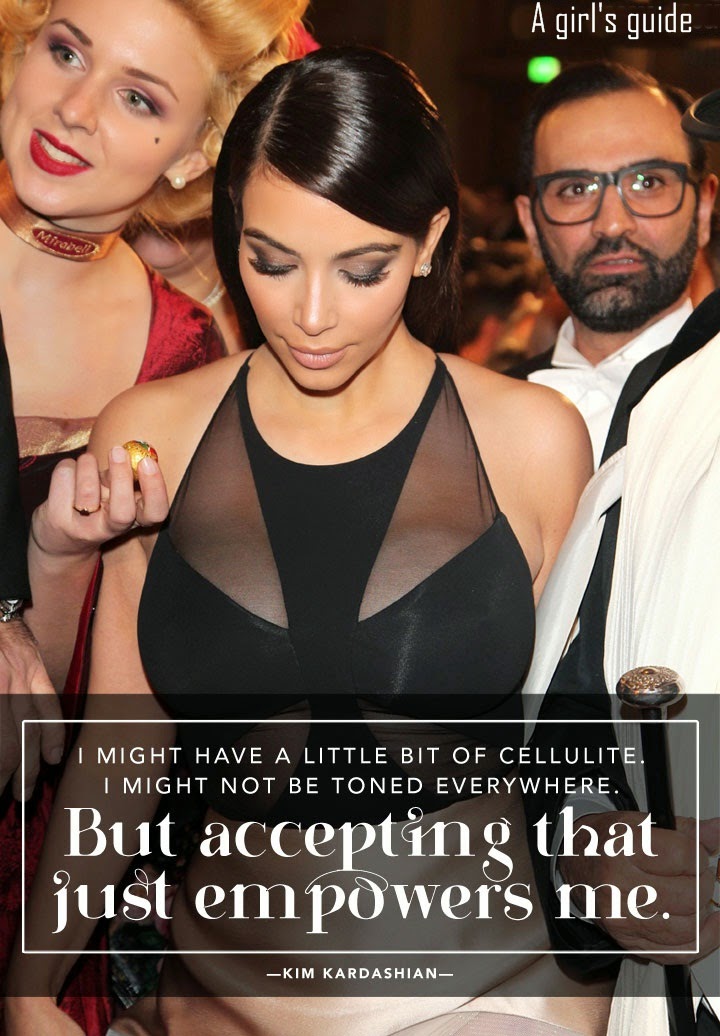
   "I might have a little bit of cellulite. I might not be toned everywhere. But accepting that just empowers me."

8. Kate Upton

   "I want to enjoy life, and I can't if I'm not eating and miserable."

9. Lucy Hale

  "My body is normal, and I'm not trying to prove anything."

10. Serena Williams

    "My smile is my favorite part of my body. I think a smile can make your whole body."     

11. Miley Cyrus


     "I don't wanna be shaped like a girl. I love being shaped like a woman, and trust me ladies, your man won't mind either." ;)

12. Fergie


    "I have learned to enjoy my body when I have a few extra pounds on, just being more voluptuous."

13. Gabourey Sidibe

     "One day I had to sit down with myself and decide that I loved myself no matter what my body looked like and what other people thought about my body."

14. Jessica Simpson
   

"I'm just your everyday woman who is trying to feel good and be healthy for her daughter, her fiancé, and herself."

15. Adele

    "I would only lose weight if it affected my health or sex life, which it doesn't."

16. Demi Lovato

    "I'm not going to sacrifice my mental health to have the perfect body."

17. Ashley Greene

    "I don't want a child's body. I want a woman's body that is extremely fit. It's so much sexier."

18. Amber Riley

     "I'm not going to conform and hurt myself and do something crazy to be a size 2."   


Makeup How-To: Sexy Ombré Red Lip

A strong lip couldn't be more stunning, but if you want to give this classic look a modern twist, add some ombré into the mix. Makeup artist Lauren Cosenza explains just how to get this killer black-to-crimson pout.


1. Camouflage your lips with a non-drying concealer to prevent feathering. "When you're applying such intense hues, you want to prevent any movement of your lip color, such as feathering or bleeding," Cosenza says. Model Bianca used Bobbi Brown Concealer in Natural Tan. "After you've applied cover-up all over your lips, continue by lining the outside of your natural lip line with No Bleeding Lips for extra protection against your lip color traveling."

2. Outline your lips in black. "Using a black eye liner — one that's safe to use on your mouth too — start lining your entire pout, and then fill in the outer corners only," she says. "This will create that gradated effect once you put the pop of color on your lips." Bianca used Urban Decay 24/7 Glide-On Eye Pencil in Zero — its ingredients are non-toxic and vegan, so they won't harm you if you ingest the formula.

3. Coat your lips in a classic red shade. Starting from the center and blending out toward the black liner, apply your favorite red lipstick with a lip brush. Bianca went with Make Up For Ever Rouge Artist Intense Color Lipstick in #42 Satin Vermilion Red. "Make sure to blend the colors with the lip brush where the edges meet to get that seamless ombré look," Cosenza adds. "And you can even top it with a clear gloss to give it that patent finish."
Now all you have to do is figure out where you're going to flaunt this notice-me look.

Dot Dot Dotters!

When I first started dipping into nail art I wasn’t very sure how serious I would take it. I didn’t know if I would, or even could, keep up with it. For that reason, the less money I spent on tools, the better. So, off I went on an internet adventure, looking for ways to improvise. After a little research I found a few ways to make dotting tools with stuff you probably already have! If you are a seasoned nail artist, this should come as no surprise to you. If you are a beginner, you’re in luck! I am here to share these not so secrets with you.

What you will need:
  • toothpick
  • bobby pin
  • pencil and straight pin
You really only need one of those things but I’ve included all three plus an actual dotting tool for comparison.


 The toothpick is pretty easy to use. Simply, pick which end to use (depending on the size you want your dot), dab into some polish or acrylic paint and dot away! If you aren’t too confident in your dotting skills then I recommend using acrylic paint. It is much more forgiving. If you make a mistake, just take a q-tip, put a little water on it, wipe it off and VOILA! Its like it never happened.
I think the trick is to have a light hand. If you put too much pressure while dotting one of two things can happen; the polish will push out and there will be none left in the middle or, it will be a million times harder to get a good looking dot. Don’t be afraid to do a little practice run on a piece of paper before going on to your nail.


The bobby pin is a little trickier. Like the toothpick, you don’t have to do anything to it, just dab and dot. It is very thin and flat which makes it easy to lose grip. You can open it up if that helps. This one is something I would use as a last resort.
The pencil and straight pin is by far my favorite makeshift dotter. The width of the pencil makes it super easy to handle and the semi flat head of the pin is the closest you will get to an actual dotter. All you have to do is stick the straight pin into the eraser end of the pencil. Easy peezy, lemon squeezy!


There you have it, three different ways to make your own dotting tool with stuff that you most likely have just laying around. I’ve used all three and a dotting tool on a piece of paper to show the results each one gave me. With the dotting tool and toothpick I used both ends to get different sized dots. As you can tell, they all look pretty similar.


Dots are very versatile, so don’t be afraid to get creative! Here is a mani I did using all four tools:


You can barely even tell the difference, huh?! Now, get to dotting!


Polkadots and Roses Nail art mini tutorial

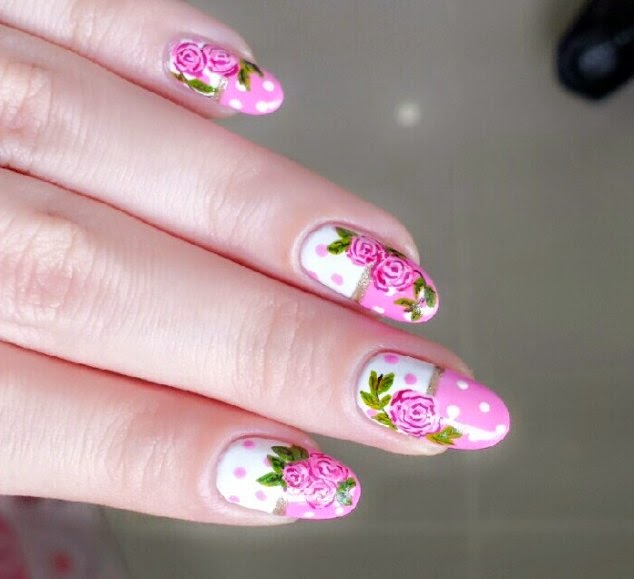
Here I have a Rose Nail art for u guys that you will totally love.Whenever i am out of ideas, i turn to roses. They are just so easy and pretty looking that i cannot seem to stay away from them for too long. Check out the photos below to see how i did them :) 

As you can see below, this is the base of my nail art before i start on the roses. I painted 2 layers of a white polish before i paint on 1 layer of a medium pink polish on the bottom half of my nails. Don’t worry about the line being neat because you will go over the line with some gold polish. Then add on some alternating polkadots with a dotting tool or toothpick and you will get the results below!


So the trickier part comes when you are drawing the roses. Usually i use at least 3 shades of a colour for the roses for added dimension. I start off by using the medium shade to draw blobs on the nails. I then randomly draw on squiggles using the lighter and darker shade to bring out the effect. Everyone has different methods so just experiment with what you like best! For the leaves, i utilize the same concept and use lighter and darker shades of green to accent different parts of the leaves. And voila! you are done! The results may not be ideal at first but keep experimenting and you will find a look that you like. The best part about drawing roses is that every single rose looks different so you don’t really need to get them perfect.


Hope you guys loved it! :D 

Thursday 1 May 2014

SUMMER SPLASH

The summer is Here! and here are some nail art designs that anyone will love to celebrate their love for the Summers. The Spring Summer time is so much fun! it just inspire me to do fun bright nail designs and I am kicking spring ans summer off with a"in your face" summer neon gradient. It so bright and seriously so juicy looking just reminds me of the popsicles.
I sponged on the gradient using Orly's melt your Popsicle and a random neon pin nail polish for a transition color i used a peachy pink shade to really blend the colors together. So happy with how it turned out :).

Before i started doing this Nail art I already planned on adding something to the gradient. However i loved the gradient so much that I wore it plain for 2 days before adding something to it. I ended up choosing a butterfly design using black acrylic paint and added some white dots to it. It looks so impressive and on the other hand it is so simple to do. It's definitely a design that anyone can achieve. They really do look like butterfly wings, don't they? fitting for the warmer weather, I hope you like these designs :) I know many of you were craving for spring and summer as it just brighten ups the LIFE. So much colors, so much fun and its finally around the corner! Enjoy the new season and i hope you guys get a lot of nice and sunny weather!